-
My CartYour cart is currently empty
-
Compare (0)
- My Account
Plan How to Install an Interior Transom Window Over a French Door
Introduction to Planning
This Planning Section is all about measuring and planning for your installation. In this section you will:
- Learn some basics and terminology -- that is, Transoms 101.
- Choose your starting point for installation.
- Determine the measurements and decisions that need to be made.
- Explore some variations to the typical installation. (Optional)
With your decisions our system will automatically create a customized set of planning steps and install instructions for your specific installation scenario. In all, the Planning Section should take you about 20 minutes.
So, this Planning Section is all about measurements — and only the decisions that affect sizes for you order.
P-INTROPlanning 1: Basics and Terminology (Transoms 101)
Learn the parts of a transom, how measurements are made, and the role of the jamb for installation.
Transoms Direct sells transom window sashes -- that is, wood frames around glass.
- Inside the wood frame, muntins separate glass into decorative panes called lites.
- A transom pattern is the unique combination of the transom's perimeter shape with the design of its interior lites.
- By adding a jamb to a transom you can adapt the thinner transom sash to a thicker wall.
- Not all installations require a jamb.
- If a jamb is required, the assembly of the transom sash with a jamb is called a transom unit.
- When ordering, you specify the width and height of the transom sash only -- not including the jamb. This will become very clear as you watch the planning videos.
Planning 2: Your Starting Point
Whether you are building a new home, completing a renovation or just adding a transom for a small project, we will help you determine your starting point for installation.
To determine the width and height for your transom sash, we first must consider your starting point for installation.
- For new construction or renovations, rough openings are the most common starting point.
- You may be planning a new opening that you have not created yet. in such case, we will help you frame a rough opening that fits the size of transom you wish to install.
- If you have a completed home, you may be able to retrofit a transom into an existing finished opening.
- Two types of finished openings are cased openings and drywalled openings. Both are suitable for a transom if the opening is tall enough for your needs.
Select Your Starting Point

Planning for a Rough Opening or New Opening
The planning steps for a rough opening and a new opening are really mirror images of one another.
- In planning for a rough opening that is already framed, you will size the transom and door to fit the opening.
- In planning for a new opening, you will size and build a rough opening to fit the door and transom you have chosen.
So the videos that follow apply to both new openings and existing rough openings — since the planning and installation sequence is similar.
P-ROND
Adding a Transom Over Existing Door
To add a transom over an existing door, you will re-use the door you have -- but obviously we must make some room in the wall above for the transom.
- The first step in installation will be removing the casing around your existing door and then removing the installed door to expose its rough opening.
- This removal is not necessary for planning purposes, you just need to know that you will be performing a rough opening installation.
- Ultimately you will need to reframe your rough opening (taller) to fit the size transom you desire.
- The planning steps below will help you understand the size rough opening you need for a given transom size.
- You may read additional tips on reframing your opening by choosing the corresponding option in the "What's Next" box below.
P-D-ONLY
Planning 3: Determine Sash Width
For installation over a door, a transom sash is placed into a jamb and the whole unit is set on top of the door. In this video, learn how to match the size of your transom to the size of your door.
- Measure the clear, inside jamb width of the door you plan to install.
- Order a transom sash that is identical to this clear inside width.
- Once you add a jamb, the transom unit should align exactly with the jamb of the door(s).
- Build a rough opening for the door and transom unit that is 2” wider than the transom sash or door slab width.
- If you already have an opening, buy a door with a slab that is 2” narrower than the opening you have.
- When installed the combined door and transom assembly will have slight gaps along the side so that they can be shimmed and set square, plumb and level.
Planning 4: Determine Sash Height
Learn to set the transom height so that the door/transom combination fits into the height of the opening you have.
The door should be set into rough opening such that the door jamb clears 81” above the finished floor.
- f you have a finished floor, set the top of the door’s jamb at 81-3/4”, which will result in 81” below the jamb.
- If you have an unfinished floor, set the top of the door's jamb 1/2” higher — or otherwise account for the finished floor height.
- The clear space above the door’s jamb but below the top of the rough opening is the area into which the transom unit will be installed.
- Measure the height of the clear space and order a transom sash that is 2” shorter than your measurement.
- In the next video you will determine the jamb depth to order for your transom unit, which will match the jamb depth of the door.
Planning 5: Measure Wall Thickness for Jamb Depth
The jamb depth that you order should match the thickness of the wall where the transom will be installed.
- If your wall assembly is already built with sheathing attached, you can use a tape measure to find the outside-to-outside dimension for wall thickness.
- You can also total-up the thicknesses of the components that make up your wall assembly to find your wall thickness. Always add 1/16" to the total.
- Walls made of plaster or fire-rated materials or walls in colder climates or urban settings often have non-standard wall thicknesses.
- If a door or cased opening is located along the same wall as your installation, you can measure the jamb of these items to find your wall thickness
Pro-Tip: We recommend that you purchase a custom-sized jamb from us when you order your transom sash. If you want to explore building your own jamb, please read our tips in the installation section before you decide to build the jamb on your own.
You have now completed the typical planning process.
P-ROXX-3Transom Placed into a Finished, Cased Opening Above a Door
You have indicated that you have a finished, 4-sided, cased opening ready for transom installation above a finished door.
Your scenario is different from a typical installation where the door unit and transom unit are installed together into a rough opening. Rather, in this installation, a transom sash will be installed as a separate matter into a pre-built, cased opening that is freestanding above the finished, painted door.
The video below details the planning for such a transom sash installation. However, do not be concerned that the video does not show a door. Planning and installation steps for your scenario is nearly identical to the scenarios shown.
P-FOC-DRPlanning 3: Determine Width & Height of Sash to Order
Since your finished, cased opening already has a jamb for its interior, you may place a properly-sized transom sash directly into the opening and stop it out. This video will show you how to determine the height and width transom for your application.
- Carefully measure the width and height of the interior of your cased opening to the nearest 1/16th of an inch.
- Order a transom sash that is 1/8” narrower and 1/8” shorter than the opening you have.
- Once your sash arrives, you will pace it in the center of the opening and secure it in place with stop moulding.
Transom Placed into a Finished, Drywalled Opening Above a Door
You have indicated that you have a finished, 4-sided, drywalled opening ready for transom installation above a finished door.
Your scenario is different from a typical installation where the door unit and transom unit are installed together into a rough opening. Rather, in this installation, a transom sash will be installed as a separate matter into the drywalled opening that is freestanding above the finished, painted door.
Your scenario is not uncommon. Typically the builder has framed-out and drywalled an opening roughly 6 inches to a few feet above the door. If the drywalled opening and finished door share the same studs along the sides (and they usually do), you should achieve good alignment between the door and transom above using these instructions.
The video below details the installation of a transom sash into the drywalled opening. However, do not be concerned that the video does not show a door. Planning and installation steps for your scenario is nearly identical to the scenarios shown.
P-FOD-DRPlanning 3: Determine Width & Height of Sash to Order
Since the drywalled interior of your finished, drywalled opening can serve as a sort of jamb, you may place a properly-sized transom sash directly into the opening and stop it out. This video will show you how to figure the correct transom width and height to fit your opening.
- Carefully measure the width of the interior of your drywalled opening to the nearest 1/16th of an inch.
- Take additional width measurements and note the narrowest measurement you get. Make your narrowest measurement the width of your opening.
- Likewise, take a number of measurements of the height of the opening. Note your shortest height.
- Order a transom sash that is 1/8” narrower and 1/8” shorter than the smallest measurements you gathered for the opening you have.
- Once your sash arrives, you will pace it in the center of the opening and secure it in place with stop moulding.
Planning 4: Complete the Simple Installation
Follow these instructions to complete your installation.
To install your transom unit in the opening:
- Insert the transom sash into the opening -- aligning the centerline of the transom sash with the centerline of the opening.
- If necessary, use small shims to correct alignment of sash so that it is square, plumb, and level in the opening.
- Use a finish nailer to secure the sash to the opening — first through the top and then the bottom.
- Cut stop moulding and install around both sides of sash perimeter.
- Paint casing, interior of drywalled opening and transom sash the same color.
Variations to a Typical Installation
Remember, the planning section above is all about determining measurements and sizes -- width and height of the sash, depth of the jamb (if applicable), dimensions of the rough opening, etc.
Variations (covered here) also involve changes that can affect installation, dimensions or sizes in some way.
Customizations (not covered here) are things that don't affect size -- like operable transoms, water resistance or special glass. We will address customizations once planning is complete.
Not all starting points allow all variations. For instance, installing an arch-top or half-round transom is not possible using a finished, cased opening as your starting point (one is round and one is square). If you don't see a variation you are looking for, try a different starting point by altering your opening (see "What's Next" below). All possible variations are allowed for a rough opening starting point.
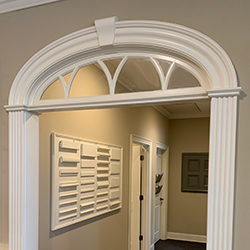

Arch-Top and Half-Round Transoms
Considering an arch-top or half-round transom? Good news! The planning for an arch top or half round transom is identical to a normal, rectangular transom.
Use the height of the arch or half-round unit as the height of an imaginary rectangular transom that would completely contain your arch or half-round design. Follow the regular planning process, using these rectangular measurements for planning.
Before you drywall your rough opening, review the installation tip for arch and half-round transoms (see Install section). As you will discover, hanging the drywall so that it overlaps the transom’s opening will allow you to cut the drywall to fit once the transom unit arrives.
The installation tip also covers measuring and ordering curved casing. Read the tip now so you can order your casing before your transom arrives.
P-V-AH
Transoms Set with Taller Mulls
The mull is the horizontal joint where the head jamb of the U-Jamb or door jamb is connected to the jamb of the transom unit above. Think of it as the junction of the two jambs, or if you are going into a finished opening, the junction of the two spacers that simulate the two jambs.
Normally there is a zero inch gap between the two jambs, and the thickness of the mull is exactly 1-1/2” from top to bottom (the combined thickness of two 1x pieces). The horizontal line of this zero-inch joint is easily covered at trim-out by a piece of 1-1/4” mullion.
In the picture above, you can see a mull that is obviously more than 1-1/2”. In fact this mull has been designed to fit a piece of 1x4 flat casing exactly. In this example the total mull height is 4-1/2”, or 3 inches more than than a standard mull height with a zero gap.
Increasing the thickness of the mull by 3” is quite easy. Take two 2x6s, rip them to match the width of the jamb, cut them to length, and place them between the two jambs — adding exactly 3”.
But remember that by increasing the size of the mull, you are also increasing the height of the opening required to handle the transom unit with its taller mull. Adjust your calculated opening height for the additional height added by the mull.
So if you are building your opening from scratch, making a taller mull simply affects planning of opening height. However, if you have your opening already built, a taller mull ultimately reduces the amount of free height available for the transom unit above the mull. That is, the transom unit will have to be ordered less tall to fit in the same opening with a taller mull.
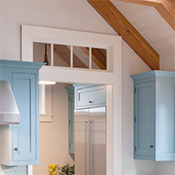
P-V-TMGanged Transoms
Two transom units can be combined together in a ganged configuration to create a unique look. Ganged transoms can also be an effective solution for very wide openings (greater than 72" or so).
The first step in planning for a ganged installation is determining the clear rough opening height and width available for the installation. You already know these measurements -- they were calculated in the planning videos above. From the videos, you determined both the sash width and height for ordering and a rough opening size that was 2” wider and 2” taller than the sash size calculated.
Taking an example rough opening of 82” wide, let’s determine the sash size we would order for two transoms units that would be ganged together to fit this opening.
First off, ganged transoms do not affect the sash height for ordering -- so just order both transoms with the same sash height that you determined from the videos.
Both sashes will need to be set in their own jamb, so that makes calculating the width of each sash just a tiny bit more complicated. Let’s start with the 82” wide opening and subtract 2”. That leaves us the 80” and will account for one of the two jambs and for the 1/2” "wiggle room"" needed for the entire ganged assembly during installation.
Normally, we would just take this 80” wide and that would be our sash width, but in this case we divide by two giving us a 40” width per sash. That get’s us close, but we must account for one more thing — the interior jamb pieces that separate the left and right sashes into individual transom units. Each of these is 3/4” wide, so we need to subtract 3/4” from 40” giving us a sash width of 39-1/4” each.
So, we would order two 39-1/4” wide transoms sashes to fill a 82” wide rough opening.
Let’s check our math knowing that we want 1/2” fluff on an 82” wide rough opening. That leaves us with 81-1/2” of width to account for.
First we have two sashes of 39-1/4”. That 39-1/4” x 2 equals 78-1/2”. Each sash is surrounded by a 3/4” jamb on all sides for a total 3/4” x 4 or 3” of jamb material from left to right. Adding 3” to 78-1/2 we get 81-1/2” which matches our check number without fluff.
After your transom units arrive, mull them together using 1-1/4" trim nails or trim screws. Then proceed with a normal installation, treating the entire assembly as one transom unit.
P-V-GAGanged Transoms (Into a Finished, Cased Opening)
For this installation you are using the jamb of an existing, installed finished opening to act as the jamb for the transom sash you order. The sash is installed directly into this jamb.
If you desire to simulate the look of mulled transoms placed into an existing finished opening, simply simulate adding the two interior jamb pieces that would form the interior jamb pieces of the left and right transom. In other words, plan that two additional pieces of 3/4” jamb material would be placed vertically into the center of the opening — bisecting it into two equal parts.
Order two equally-sized transom sashes that are each 1/8” narrower than the new openings. The height of the sash will remain unaffected by the change to a “mulled” look.
P-V-GA-FO1
Ganged Transoms (Simple Installation into Drywalled Opening)
For the Simple Installation you use the existing, drywalled finished opening to act as receiver for a properly sized transom unit.
In the videos above you calculated the height of the sash to order. The height remains the same for ganged transom.
Normally, you would order a transom sash that is 1-5/8” narrower than the width of your opening. This accounts for the 3/4” of jamb on each side of the transom sash plus 1/8” for wiggle room.
There is no need to account for the wiggle room more than once, so when planning for a “ganged transom look” take your rough opening width and subtract the 1/8” once. Take this resulting measurement, divide by two, and subtract 1-1/2”. The result will be the width of each of the two transom sashes that you will order to create the “ganged” look. Remember to order each of those sashes with properly-sized jambs to fill-in the 1-1/2” you just subtracted.
P-V-GA-X-FOD
Extra-Wide/Tall Transoms
At Transoms Direct we will make any transom that we can ship to your location. While any size is possible, we try to avoid the high cost of dedicated freight.
Any transom that can be electronically ordered on this website can be shipped UPS or Fedex under normal ground shipping guidelines. In general, this includes sashes and sashes with jambs for any pattern up to 72” in sash width and 16” in sash height.
We regularly build windows taller than 16" (that is, interior and exterior fixed windows), but you will need to call for those configurations so we can calculate shipping.
If you need a transom sash wider than 72” and can restrict the sash height to 12", we can usually ship 12" tall sashes up to 80” wide without a jamb. Above 72", you will need to call and discuss exact shipping availability to your location.
Above 72” wide you also have two other options -- both of which can be ordered on the website without a call:
- Option 1: Ganged Transoms. You can gang two transoms together by placing them each in their own jamb and mulling the two transom units together as shown in the picture. See the "Ganged Transoms" variation above.
- Option 2: Split Sash. One of our most popular transoms is the TR-1. Since this pattern is made of individual panes and vertical muntins, we can can break the transom into two or more shorter sections that can be assembled together at your job site. With this technique, we can form a transom sash of virtually unlimited length that still can be shipped by standard UPS.
The transom in the selection picture above would be made by ordering two sashes in a split configuration. Assuming the example in this picture is 8 feet in sash width, two 4 foot sash pieces would be fabricated and shipped to you. Once the two pieces arrive at your location, the insertion of a couple (included) pocket screws would reassemble the transom sash to its final length. Obviously, this example has an equal number of lites (which makes splitting it on the middle muntin possible). In other cases, we will split the transom as necessary to achieve the desired width.
To order a split sash, order two sashes that are half the length of the total sash length you desire. Add a special instruction to the first sash you configure that says “split sash.” Adding a special instruction is covered in a video in the customizations section. Once you have the sash added to the cart, change the quantity to two using the shopping cart's tools.
P-V-EWPocket Doors
From the standpoint of a transom installation, pocket doors are completely different than ordinary doors. The videos that you have viewed above give you good visualizations of how a transom unit sits directly atop a door unit, jamb to jamb. For a pocket door, the transom unit will sit directly atop a pocket door frame header after the entire pocket door kit has been installed.
If you are considering a pocket door and are unfamiliar with its installation, we strongly encourage you to watch this video that details a pocket door installation. We exclusively recommend the Johnson Hardware 1500 Series pocket door kits featured in the video.
Once you have watched the whole pocket door installation video, note these key points to plan for a transom above:
- The main track that the pocket door “slides on” is called a pocket door frame header. It’s one of the things you get in your pocket door kit.
- The pocket door video gives instructions for determining the framing height of the rough opening header that will ultimately set above the pocket door frame header. The video says the minimum height for this rough opening header is door height plus 4-1/2” — minimum, meaning that we can move it higher. For a single pocket door installation this framing member is non-structural in a sense that the pocket door frame header is not attached to it in any way. Its just a nailer for drywall.
- In a nutshell, we can raise the horizontal wall framing member higher to fit a transom above the pocket door without impacting the basic install technique of the pocket door. How high you can raise the rough opening header depends on the construction of your wall.
- The pocket door frame header will be set at the height prescribed by the pocket door instructions.
- Once your wall framing member is raised there will be a clear vertical height between the top of the pocket door frame header (below) and the top of your framed opening (above). Treat this clear vertical height as the rough opening height for the transom.
- For example, if you framed the rough opening header 18-1/2” higher than the door height (81”), you would be left with 14” of rough opening height after following the pocket door instructions (18-1/2” minus 4-1/2” equals 14”).
- For best results, frame your rough opening, install your pocket door kit and then measure this rough opening height directly using your as-built opening.
- Transom sash height and width are, of course, needed for ordering.
- Calculate your sash height by subtracting 2” from your rough opening height.
- Calculate your sash width by taking your door slab width measurement and subtracting 3/4”. This adjustment in width will align the transom directly above the finished door opening by accounting for the portion of the pocket door that remains in the wall when the door is completely closed.
- Order your transom with jamb using the normal jamb depth as you would determine from door planning videos above.
- Hang the drywall as you normally would for pocket door — so drywall completely covers the clear height between the pocket door frame header and the rough opening header that you have raised above. You will later cut out an opening for the transom unit (above the pocket door opening) during transom installation.
We recommend reading the installation tip for pocket doors in the Install section before you order your transom.
Once installed, the pocket door and transom combination will have a taller mull than normal. Trimming this taller mull is covered in the installation tip.
Pro-Tip: For double-hung pocket doors or single-hung door slabs wider than 3 feet, follow the same planning instructions above. Before drywall, you may need to add a ply of 1x material or a 2x4 above the pocket door frame header to stiffen the pocket door frame header (especially if joining two pocket door kits together). Be sure to account for this stiffener when calculating the rough opening height for your transom.
P-V-PDP-DEC2-VAR
What's Next?
After watching the videos above, you should know the size of the transom sash to order that will fit your opening. Choose the answer below that matches how you would like to proceed.
Moving to the Next Step
Congratulations on completing the planning process! As you leave be sure that you can answer each of the following questions:
- Width and height of transom sash to order?
- Depth of the jamb (if required)?
- Width and height of rough opening (if applicable)?
If you can answer all of these questions you are ready to learn about customization in the next step or proceed directly to the shopping page.
Pro-Tip: Since some of our transom patterns have intricate muntin designs that must fit in the available space, these patterns may also have minimum ordering heights.
Best advice: Try to order the transom pattern you want in the size you need. If there is a sizing problem, our system will alert you and provide alternatives for your consideration.
D3-ORDERIntroduction to Installation Instructions
Installation instructions may refer to techniques discussed in the planning videos.
Below the main installation instructions are specific tips for your installation. Tips provide more detail about certain portions of the installation process.
You can return to these exact install instructions in the future by clicking on Step 5 or the "Install" menu item.
D3-INSTALL
Altering your Opening
If you are not happy with the size of the transom that fits your opening, the most practical alternative is to:
- Revert the opening back to a rough opening (if needed), and
- Change the size of the rough opening.
The rough opening is the simplest and most common starting point for transom and door installations. We provide complete instructions for all installations into rough openings — just choose rough opening as your starting point above in the decision box above.
Pro-Tips: If you want to change the size of an existing rough opening, here are few tips:
- Consult a building professional or engineer to see if your existing wall is structural or non-structural. New walls (in renovations) are usually non-structural by nature.
- Structural walls may require a header above your opening (to transfer load) that can eat up vertical wall space above the planned installation.
- Non-structural walls provide the most freedom in height for your opening since a structural header is not required.
- Rooms with taller walls, like 9 or 10 ceilings, provide more opportunity for taller rough openings and taller transoms even along structural walls that require a header. The header can often simply be moved up in the wall or changed to a different material (like an LVL) to save space.
- For rooms with 8 foot structural walls, consult a pro to see if the load transfer can be moved into the ceiling. This is often possible if attic is above the room.
- Rooms with an 8 foot ceiling can usually accommodate 10” transoms above doors and openings when a header is not required above.
- For rooms with lower ceilings, be sure to read our installation tip for trimming out your transom. We can explain how to integrate your transom with your crown moulding like a pro.
New Walls or Reframed Rough Openings
If you are framing a new wall or reframing a new rough opening in an existing wall, consider these tips:
- Consult a building professional or engineer to see if your existing wall is structural or non-structural. New walls (in renovations) are usually non-structural by nature.
- Structural walls may require a header above your opening (to transfer load) that can eat up vertical wall space above the planned installation.
- Non-structural walls provide the most freedom in height for your opening since a structural header is not required.
- Rooms with taller walls, like 9 or 10 ceilings, provide more opportunity for taller rough openings and taller transoms even along structural walls that require a header. The header can often simply be moved up in the wall or changed to a different material (like an LVL) to save space.
- For rooms with 8 foot structural walls, consult a pro to see if the load transfer can be moved into the ceiling. This is often possible if attic is above the room.
- Rooms with an 8 foot ceiling can usually accommodate 10” transoms above doors and openings when a header is not required above.
- For rooms with lower ceilings, be sure to read our installation tip for trimming out your transom. We can explain how to integrate your transom with your crown moulding like a pro.
P-DEC3-CYO
Installing a Transom Above an Opening
Staring Point: Rough opening.
Material Needed: Transom unit (transom sash in a jamb), 1x material for U-Jamb, casing, mullion. Optional: spacer blocks and shims.
Tools Required: Nail gun, saw, carpenters level.
Installation instructions may refer to techniques discussed in the planning videos -- so review them as needed. We recommend reading all installation steps before you begin. More information on certain installation steps can be found in the tips section below.
Pro-Tip: Transoms with more intricate muntin patterns are best painted or stained before installation.
Installation Steps
- If not already complete, frame opening to match transom sash size ordered. Pay careful attention to finished floor height when measuring to frame top of opening.
- Wall sheathing, such as drywall, must be installed on both sides of the rough opening before the installation can begin. See the tip below to prepare for an arch or half-round transom, if applicable.
- If you have ordered the transom with a jamb from the factory, you are ready-to-install. Otherwise, read the tip below to build your own jamb.
- Build the U-Jamb using tip below.
- Lay the U-Jamb flat on the floor and position your transom unit atop the head jamb. Jamb edges should be flush between the U-Jamb and transom unit.
- Affix the U-Jamb to the transom unit with several 1-1/4" trim nails. Nail through the interior face of the transom jamb into the U-Jamb.
- While the entire assembly is still on the floor, go ahead and trim-out the side of the assembly facing-up. Run casing on the sides and top. Add mullion to cover the seam along the head jamb beween the U-Jamb and the transom's jamb. Follow trim-out tips below.
- Lift the assembly upright by pivoting on the U-Jamb legs. Slide the entire assembly into the opening.
- If you have an unfinished floor, use small blocks to adjust U-jamb legs to finished floor height.
- Using a carpenters level, ensure that the assembly is square, plumb and level in the opening. You may use shims if desired. Once set, use 2" trim nails to shoot through shims from the inside of the jamb to hold them in place.
- After shim placement, nail casing to wall with 2" trim nails.
- Finish the installation by trimming out the opposite side of the assembly with casing and mullion.
- Consider our tips below for preparing and painting your transom. Installation is complete.
I-O-RO
Installing a Transom Above an Opening
Starting Point: Cased, finished opening.
Material Needed: Transom sash, 1x material for spacers, mullion. Spacers are made of 1x material that you supply — usually paint grade pine or stain grade 1x material to match the transom you have ordered.
Tools Required: Table or radial saw, nail gun.
Installation instructions may refer to techniques discussed in the planning videos -- so review them as needed. We recommend reading all installation steps before you begin. More information on certain installation steps can be found in the tips section below.
Pro-Tip: Transoms with more intricate muntin patterns are best painted or stained before installation.
Installation Steps
- Precisely measure the width of your cased opening as shown in the planning video. Measure interior width from jamb to jamb (not including the casing).
- Cut spacers to length from 1x material -- matching the exact width of your finished opening.
- Precisely measure the depth of the jamb of your finished opening as shown in the video. Again, do not include the casing.
- Rip the spacer pieces so that their width equals the depth of the jamb.
- Place lower spacer into opening with bottom face 81" above the finished floor. Be sure that the spacer is level, and align edges with existing jamb.
- Toe nail lower spacer from top with 2" trim nails, or use pocket screws to secure in place.
- Add upper spacer atop lower spacer, align, and secure spacers together with 1-1/4" brad nails.
- Place a properly-sized transom sash into the opening formed by the jamb and spacers so that the sash is aligned in the center of the jamb -- plumb and level.
- Follow the tip below to stop out the transom sash in the opening.
- Finish the installation by adding two pieces of mullion to conceal the gap between the spacers on each side of the window. See trim-out tip below.
- Please consult preparation and painting tips below. Installation of the transom is complete.
Installing a Transom Above an Opening
Staring Point: Drywalled, finished opening.
Material Needed: Transom unit.
Tools Required: Nail gun, carpenter's level.
Installation instructions may refer to techniques discussed in the planning videos -- so review them as needed. We recommend reading all installation steps before you begin. More information on certain installation steps can be found in the tips section below.
Pro-Tip: Transoms with more intricate muntin patterns are best painted or stained before installation.
Installation Steps
- As shown in the planning video, place the transom unit up into the opening aligning the centerline of the transom unit with the centerline of the opening.
- Use an assistant or some temporary stud braces to hold the transom unit in place while you adjust its position.
- Use a carpenter's level to make sure the transom unit is level. Use small shims above the top jamb, if necessary, to make minor corrections.
- Adjust left/right position of the transom unit in the opening such that you have roughly equal gaps on each end of the transom unit between the jamb and the sides of the opening.
- Secure the transom unit in place by face nailing through the interior of the jamb along the sides and top with 2" trim nails. Repeat the nailing pattern on both sides of the sash.
- Installation of the transom unit is now complete. Use caulk to fill in the small gaps around the perimeter of the transom unit, and also read the tips on preparing and painting your transom below.
Installing a Transom Window Over a Door
Staring Point: Rough opening.
Material Needed: Transom unit, door unit, casing and mullion.
Tools Required: Nail gun, carpenter's level.
Installation instructions may refer to techniques discussed in the planning videos -- so review them as needed. We recommend reading all installation steps before you begin. More information on certain installation steps can be found in the tips section below.
Pro-Tip: We always recommend using pre-hung, flat-jamb door units for transom installation. If you happen to be using a pre-hung, split-jamb door that is already cased (like from Lowes or Home Depot), remove and discard the casing. The door will need to be re-cased with the transom added.
Bonus Pro-Tip: Transoms with more intricate muntin patterns are best painted or stained before installation.
Installation Steps
- If not already complete, frame opening to match door and transom size planned. Pay careful attention to finished floor height when framing top of opening.
- Install uncased door unit into opening per manufacturers instructions at the correct height for the finished floor. This includes adjusting the door unit so that it is square, plumb and level, and shimming the hinges and strike so that it is ready for operation.
- Slide transom unit into the opening directly atop the head jamb of the door. Align the sides so that the jambs of the transom unit and door unit are perfectly aligned. Jamb faces should be flush on both sides.
- At the interior of the transom's jamb, face nail the transom unit to the door unit using 1-1/4" trim nails along each side of the sash.
- Trim-out the both sides of the assembly -- including adding mullion to cover the seam beween the door head jamb and the transom's jamb. Follow trim-out tips below.
- Your transom/door unit assembly is now complete. Please review the preparation and painting tips below.
Installing a Transom Window Over a Door
Staring Point: 4-sided, finished, cased opening
Material Needed: Transom sash, stop.
Tools Required: Nail gun, miter saw.
Installation instructions may refer to techniques discussed in the planning videos -- so review them as needed. We recommend reading all installation steps before you begin. More information on certain installation steps can be found in the tips section below.
Pro-Tip: Transoms with more intricate muntin patterns are best painted or stained before installation.
Installation Steps
- Insert the transom sash into the opening -- aligning the centerline of the transom sash with the centerline of the opening.
- If necessary, use small shims to correct the alignment of sash so that it is square, plumb, and level in the opening.
- Use a finish nailer to secure the sash to the opening — following tip on stopping out transom below.
- Cut stop moulding and install around both sides of sash perimeter.
- Paint transom sash to match casing and jamb of finished opening. See our tip on prepping and painting below.
Installing a Transom Window Over a Door
Staring Point: 4-sided, finished, cased opening
Material Needed: Transom sash, stop.
Tools Required: Nail gun, miter saw.
Installation instructions may refer to techniques discussed in the planning videos -- so review them as needed. We recommend reading all installation steps before you begin. More information on certain installation steps can be found in the tips section below.
Pro-Tip: Transoms with more intricate muntin patterns are best painted or stained before installation.
Installation Steps
- Insert the transom sash into the opening -- aligning the centerline of the transom sash with the centerline of the opening.
- If necessary, use small shims to correct the alignment of sash so that it is square, plumb, and level in the opening.
- Use a finish nailer to secure the sash to the opening — following tip on stopping out transom below.
- Cut stop moulding and install around both sides of sash perimeter.
- Since we are using the drywalled opening like a jamb, the drywall corner bead edge is playing the role of the interior edge of the jamb. Install casing around the perimeter of both sides of the transom. Follow our tips on trim-out below.
- Paint casing, interior of drywalled opening and transom sash the same color. See our tip on prepping and painting below.
Installing a Transom in a Wall Between Rooms or Overhead in Wall
Material Needed: Transom unit (transom sash in a jamb), casing, mullion, shims.
Tools Required: Nail gun, saw, carpenters level.
Installation instructions may refer to techniques discussed in the planning videos -- so review them as needed. We recommend reading all installation steps before you begin. More information on certain installation steps can be found in the tips section below.
Pro-Tip: Transoms with more intricate muntin patterns are best painted or stained before installation.
Installation Steps
- If not already complete, frame opening to match transom ordered.
- After framing, the wall sheathing, such as drywall, must be installed on both sides of the rough opening before the installation can begin.
- Slide transom unit into wall opening. Using a carpenters level, ensure that the transom assembly is square, plumb and level in the opening. Add shims as needed to set the transom. See the tip "Shimming and Squaring Your Transom" for more detail.
- Secure the transom unit into to the opening by face nailing through the jamb and shims into the framing studs. Do this on both sides of the sash.
- Once the assembly is correctly secured, nail the casing around the perimeter using 2" trim nails. Read the tip on "Trimming-Out Your Transom" for more detail.
- Trim out the opposite side of the assembly with casing.
- Follow our tip on "Preparing and Painting Your Transom" to complete your installation.
I-W-RO
Installing a Transom in a Wall Between Rooms or Overhead in Wall
Material Needed: Transom sash, stop.
Tools Required: Nail gun, miter saw.
Installation instructions may refer to techniques discussed in the planning videos -- so review them as needed. We recommend reading all installation steps before you begin. More information on certain installation steps can be found in the tips section below.
Pro-Tip: Transoms with more intricate muntin patterns are best painted or stained before installation.
Installation Steps
- Insert the transom sash into the opening -- aligning the centerline of the transom sash with the centerline of the opening.
- If necessary, use small shims to correct the alignment of sash so that it is square, plumb, and level in the opening.
- Use a finish nailer to secure the sash to the opening — first through the top and then the bottom.
- Cut stop moulding and install around both sides of sash perimeter. See out tip on “Stopping-Out Your Transom”.
- Paint transom sash to match casing and jamb of finished opening. See our tip on “Painting and Finishing Your Transom.”
Installing a Transom in a Wall Between Rooms or Overhead in Wall
Material Needed: Transom unit (transom sash in a jamb), casing, mullion, shims.
Tools Required: Nail gun, saw, carpenters level.
Installation instructions may refer to techniques discussed in the planning videos -- so review them as needed. We recommend reading all installation steps before you begin. More information on certain installation steps can be found in the tips section below.
Pro-Tip: Transoms with more intricate muntin patterns are best painted or stained before installation.
Installation Steps
- Insert the transom sash into the opening -- aligning the centerline of the transom sash with the centerline of the opening.
- If necessary, use small shims to correct the alignment of sash so that it is square, plumb, and level in the opening.
- Use a finish nailer to secure the sash to the opening — first through the top and then the bottom.
- Cut stop moulding and install around both sides of sash perimeter. See our tip on “Stopping-Out Your Transom”.
- Since we are using the drywalled opening like a jamb, the drywall corner bead edge is playing the role of the interior edge of the jamb. Install casing around the perimeter of both sides of the transom. Follow our tips on "Trimming-Out Your Transom".
- Paint casing, interior of drywalled opening and transom sash the same color. See our tip on “Painting and Finishing Your Transom.”
Installing a Replacement Transom
Material Needed: Transom sash, stop.
Tools Required: Nail gun, miter saw, claw bar, utility knife, hammer.
Installation instructions may refer to techniques discussed in the planning videos -- so review them as needed. We recommend reading all installation steps before you begin. More information on certain installation steps can be found in the tips section below.
Pro-Tip: Transoms with more intricate muntin patterns are best painted or stained before installation.
Installation Steps
- At the sash that will be replaced, go to stop side and use a utility knife to cut the caulk along all joints of the stop. Cut caulk at mitered stop corners.
- On opposite side, cut all caulk that touches the transom sash as well. Now there should be no caulk holding the sash in place.
- Using a small pry bar, remove stop on one side of the transom.
- From the side opposite the stop, press the transom sash firmly to remove sash from jamb. You may need to use a hammer against a wood block to gently knock the transom out of the hole and clear all the caulk.
- Insert the new, replacement transom sash into the opening -- pressing the jamb into place along the centerline of the opening.
- If necessary, use small shims to correct the alignment of sash so that it is square, plumb, and level in the opening.
- Use a finish nailer to secure the sash to the opening — first through the top and then the bottom.
- Cut stop moulding and install around both sides of sash perimeter. See out tip on “Stopping-Out Your Transom”.
- Paint transom sash to match casing and jamb of finished opening. See our tip on “Painting and Finishing Your Transom.”
All steps below reference instructions found in this video for the Johnson Hardware 1500 Series pocket door kit.
Material Needed: Johnson 1500 Series Pocket Door Kit (purchased from a local dealer), shims.
Tools Needed: Drywall saw, nail gun. You will also need tools required by the pocket door kit.
- Frame your rough opening per our pocket door planning instructions in the Planning section.
- Proceed through all pre-drywall pocket door installation steps detailed in the Johnson video. This includes installation of the pocket door frame header and split jamb pieces per the video.
- Hang the drywall as you normally would for a pocket door. Drywall will completely cover the area where the transom unit will be later installed.
- After drywall, you should see an opening only the size of a single door as shown in the Johnson video.
- Using the width and location of the door opening as a guide, cut the drywall above the pocket door frame header to form an opening for your transom — leaving a rectangular opening spanning vertically from the top of the pocket door frame header up to the framing header. The transom unit will set directly above the door opening, atop the pocket door frame header. A small strip of drywall should remain below the new opening that is still attached to the pocket door frame header.
- Inside the new opening, one side will blocked off with a stud and the other will be on open drywall hole. If desired, add blocking material between the free-hanging drywall pieces on the “open side,” attaching the blocking to the drywall to add stiffness .
- When your transom unit arrives, slide the unit into the opening above the pocket door frame header. Be sure that the bottom of the transom unit sits flat against the top of the pocket door frame header (wood against wood).
- Be sure that the transom unit is plumb, square and level in the opening, then place shims above the transom unit — filling the gap above (about 1/2”). Secure the transom unit to the upper framing header by nailing through shims using 2 to 2-1/2” trim nails.
- Complete the remaining steps in the pocket door installation, including installation of the split jamb along the open side and the top side.
- Review our installation tip on trimming out your transom. Know that you will need a larger piece of mullion, perhaps 3”, to span the distance from the transom jamb to the split jamb of the pocket door below.
I-D-PD
Material Needed: Drywall and some blocking material like 2x4s.
Tools Required: Drywall saw, saw, pencil, nail gun.
For planning purposes we treat arch and half-round transoms as if they were rectangles. That gets the rough opening right.
On installation, the drywall (or other wall sheathing) must be cut to fit the curve of the transom unit.
This is easier than it sounds, but you have to pre-hang your drywall down into the rough opening. Follow the directions below.
- During your regular drywall hanging process, hang the sheet of drywall to be placed above your rough opening so that it overlaps into the rough opening hole. Hang it low enough vertically so that it extends slightly beyond the lowest edges of the curve on the sides of the transom jamb. If in doubt, hang it the same distance down into the opening as the sash height.
- When your transom arrives, have an assistant help you to raise the transom unit up against the hanging drywall at the position where it will sit in the opening. Be sure to account for door or U-Jamb height if that applies to your installation.
- Use a pencil to trace the curve of the transom jamb onto the drywall.
- Repeat this process for both sides of the opening.
- Using a drywall saw, cut the drywall to match the curve of the transom unit. You may want to cut an opening that is a bit more generous than your original mark -- perhaps leaving a 1/4" gap to ease sliding the transom into the opening. Any reasonable gap will be covered by the casing anyway.
- You will be left with two smaller, more manageable pieces of drywall hanging into your opening. Place several pieces of blocking material between the hanging pieces to stiffen up the drywall for installation. Secure blocks with 2" trim nails. These blocking pieces will sit behind the casing and provide good nailing points for attachment.
- Your preparation for an arched or half-round transom is complete. Proceed with normal installation
Casing
By their nature, arch-top and half-round transoms require require curved casing at trim out. Curved casing is widely available as flexible moulding or “flex-trim”. Carter Millwork (carterflex.com) is one of several national manufacturers of flexible moulding. Think of flex-trim as an elastomeric, rubbery material that holds a curved shape but can be adjusted to fit.
For half-rounds, the diameter is the key measurement required to order the flexible casing. Diameter for our half-round sashes is exactly the same as sash width.
Flexible casing comes in several standard curvatures that fit all intervening diameters of half rounds. You provide the manufacturer with the diameter, and they will select the curvature that can be bent into shape for your application. When ordering, the width of the casing and the sash width (diameter) will be used to calculate the length of the casing piece needed. If you would like to calculate this length yourself (in inches): (Diameter/2 + Casing Width) x 3.14.
For arch-top transoms, the amount of rise in the arch is the key measurement for flexible casing. For arch-top transoms, the vertical left and right sides of our transom (that is, the stiles) are called legs. Obviously, the legs for arch-top transoms are shorter than the overall height of the sash, with the “rise” of the arched top rail achieving full sash height. So, the sash height minus the leg height equals the “rise” of the arch.
For ordering, the manufacturer will use the rise to select the curvature profile for your application. Next, the sash width will be used to calculate the length of material required. If you would like to calculate this length yourself (in inches): (Rise x 3) + Width.
Flexible moulding is only required for the one piece of curved casing (on both sides). The remaining casing (for legs and the bottom rail) can be ordinary straight, wood casing matching the profile of the flex-trim casing you ordered. Most major casing profiles available locally will have a flex-trim version from Carter Millwork available locally as well. Go to a local lumberyard and ask to order flex-trim.
I-AHR
Material Needed: U-Jamb is made entirely of 1x material that you supply — usually paint grade pine or stain grade 1x material to match the transom you have ordered. 1x6 or 1x8 material (cut to width) is most commonly used.
Tools Required: Saw, nail gun.
- Cut all 1x stock longitudinally so width matches the width of jamb ordered for your transom unit.
- Cut U-Jamb legs 81-3/4" tall for a normal height opening.
- Cut head jamb (top piece) to the same width as the transom sash you ordered.
- Assemble the U-Jamb by placing the head jamb so that it is sandwiched between the two side legs. Affix the legs to the head jamb with several 1-1/4" trim nails shot through the face of the side legs.
The width of the U-Jamb, once assembled, should match the width of your transom unit exactly.
I-UJ
You can order your transom directly from us with a custom-sized jamb already installed (that is, as a transom unit), or you can build the jamb yourself. If you have easy access to the materials, building a paint-grade jamb for a rectangular transom is a fairly straight forward (although time consuming) task. Directions below.
Pro-Tip: Building a stain-grade jamb to match your stain-grade transom sash is a much more difficult proposition — since you will most certainly have to fabricate your own stop (just like we do). Also, we always recommend buying an arch-top or half-round transom with a jamb from the factory. Building curved jambs and stop requires specialized tools and techniques.
Material Needed: The jamb perimeter is made of 1x material (1x6, 1x8, etc.) this is usually paint grade pine. We use shoe moulding for the stop material, but any type of window stop -- or even quarter round -- can be used for the stop.
Tools Needed: Table or radial saw, miter saw, nail gun.
- Cut all 1x stock longitudinally to match depth of jamb required.
- Cut left and right (vertical) jamb pieces to match exact height of your transom sash.
- Cut top and bottom (horizontal) jamb pieces 1-1/2” wider than the width of your transom sash.
- Assemble the jamb box by sandwiching vertical jamb parts between horizontal pieces. Nail through top and bottom faces with 2” trim nails to secure sides in place.
- Transom sash thickness is exactly 1-1/16” for interior sashes. Laying the jamb box face-down on the table, fabricate temporary wood-block spacers that will be placed onto the table inside the jamb box. Properly sized spacers will suspend the sash directly in the center of the jamb once the sash is slid into position inside the jamb box.
- Slide the sash into the jamb — setting the sash directly onto the blocks. Make very minor adjustments to the transom sash width or height if the fit is too tight. This can be done by running a miter or table saw to remove a fraction of material from one or more of the sash's sides. Once placed in the jamb on the blocks, the sash should be in the dead center of the jamb.
- Shoot 2” nails through each outside face of the jamb and into the sash to secure it in place.
- The stop is placed inside the jamb (around the perimeter of the sash) along the inside corner formed by the sash and the jamb. Miter cut four pieces of stop (each side) to encapsulate the entire perimeter around the sash. Affix stop with 1” brad nails. Pro-Tip: Secure the shorter, vertical pieces in place before bending and snapping-in the longer, horizontal pieces. If shoe moulding is used, place the fatter side of the shoe against the jamb side.
- Transom unit (sash with jamb) is now complete and ready for installation.
I-BYO
Material Needed: Transom sash, stop material. We use shoe moulding for the stop material, but any type of window stop or even quarter round can be used for the stop.
Tools Required: Miter saw, nail gun.
- Place a properly-sized transom sash into the jamb opening so that the sash is aligned in the center of the jamb -- plumb and level.
- Using just a few 1-1/4" brad nails, toe-nail the transom sash in place along the sash's side edges -- being careful that nails are placed close enough to edge that they will be covered by the stop. The stop will be placed inside the jamb (around the perimeter of the sash) along the inside corner formed by the sash and the jamb.
- Miter cut four pieces of stop (each side) to encapsulate the entire perimeter around the sash.
- Install the stop on both sides, locking the transom sash in place. Pro-Tip: Install the shorter, vertical pieces on the ends before snapping the longer, horizontal pieces in place. Also, if shoe moulding is used, place the fatter side of the shoe against the jamb side.
- Your transom sash is now stopped-out and secure in the opening.
I-SO
Material Needed: Shims.
Tools Required: Carpenters level, nail gun.
Unlike doors where shims perform a structural role behind hinges and the strike plate, the use of shims in a transom installation is largely for convenience as an installation aid.
During installation shims can be used along vertical joints to set the transom jamb, U-Jamb or door jamb vertically plumb.
For transoms installed into a four-sided opening, shims can be used below the jamb to set the unit level and plumb to the opening,
For transoms placed above an opening with a U-Jamb below, pay particular attention that the transom unit and U-Jamb are square to one another and are set plumb and level in the overall opening. Shims can be used to hold one side plumb while a squareness issue is addressed by manipulating the other side. If you follow our directions to install the casing on one side of the U-Jamb/transom unit assembly before placing the assembly into the opening, the assembly will hold square better during installation.
I-SH
Starting Point: Rough opening (U-Jamb).
Material Needed: Casing, mullion.
Tools Required: Miter saw, nail gun.
Casing
Most people know about casing - the trim pieces that form a perimeter around doors, windows, cased openings and interior transoms.
Casing profiles (that is, their cut or shape) differ regionally, so we leave it up to our customers to match the casing in their home.
- Purpose of Casing: When a house is first built, casing functions to conceal the gap between the edge of the rough opening and the jamb of the door, opening or window. Since we all associate casing with this "finished look", Transoms Direct prescribes adding casing whenever it is practical tp do so — even if there is no gap to over. So if your starting point for today’s installation is a finished, drywalled opening, we recommend you add casing around the opening even if it is not technically needed. Casing just makes the final installation look more complete.
- Reveal for Casing: Common industry practice leaves 1/4" of the face of the jamb showing (on the inner side) with the remainder of the jamb covered by the casing (outer side). This area of jamb left showing is called a "reveal." This "reveal" differs regionally, so we suggest that you measure the reveal if you have a completed home and match accordingly.
- Casing for Your Installation: Place head piece of casing atop the transom unit connected to two side pieces of casing that run the combined length of the transom unit and door U-Jamb (all the way to the finished floor). Carefully measure each piece with the reveal you have chosen, then miter cut the upper left and upper right corners. Attach casing with 2” trim nails — first to the jamb, then to the drywall.
Pro-Tip: If the installation of your upper piece of casing runs into the ceiling or conflicts with crown moulding planned for above, consider replacing the casing on the top with a piece of 1x material with no miter. The side pieces of casing should kill nicely into the 1x piece, and you can wrap the crown over the top of the 1x for a very nice, integrated look.
Mullion
Most people know about casing - the trim pieces that form a perimeter around doors, windows, cased openings and interior transoms.
- Purpose of Mullion: Mullion is a narrow, thin piece of symmetrical trim stock that covers the joint between the head jamb of a door or U-Jamb and the transom jamb where they are mulled together. The mullion runs horizontally covering the seam and is sandwiched between the two pieces of casing on each side (so casing is always installed first).
- Mullion for Your Installation: Measure the gap between the two pieces of casing. Cut mullion to match. You should have some reveal on the top and bottom of the mullion, but not necessarily the same reveal as the casing. The left and right end of the mullion should directly abut the casing. Install mullion with 1-1/4” trim nails.
- Zero-Gap: If the head jamb and transom’s jamb are mulled directly together, this is a zero-gap. In this case, we usually recommend 1-1/4” symmetrical mullion to cover the seam. This is most common.
- Taller Mulls: If you have increased the size of the mull, consider a wider piece of mullion or 1x4 to perform the mullion’s function.
Pro-Tip for Trim-Outs in a Rough Opening
For installations that require a U-Jamb, we always recommend pre-trimming out one side of the transom assembly while it is still on the floor. In this instance, the casing and mullion are nailed to the jamb perimeter before lifting the entire assembly into the rough opening. The trim-out on one side makes the overall assembly stiffer as it is raised into the rough opening -- which can make it easier to shim, square and level in this situation.
In order to simplify things, we do not specifically call for a pre-trim out in our installation instructions for doors and 4-sided openings. However, in these cases, most professional trim carpenters do actually trim-out one side of the assembly first because it is faster. Just beware that this technique can make shimming and squaring doors more difficult. For 4-sided openings pre-trimming is generally recommended without consequence.
I-TO
Starting Point: Rough opening (U-Jamb or Door).
Material Needed: Casing, mullion.
Tools Required: Miter saw, nail gun.
Casing
Most people know about casing - the trim pieces that form a perimeter around doors, windows, cased openings and interior transoms.
Casing profiles (that is, their cut or shape) differ regionally, so we leave it up to our customers to match the casing in their home.
- Purpose of Casing: When a house is first built, casing functions to conceal the gap between the edge of the rough opening and the jamb of the door, opening or window. Adding casing creates a "finished look."
- Reveal for Casing: Common industry practice leaves 1/4" of the face of the jamb showing (on the inner side) with the remainder of the jamb covered by the casing (outer side). This area of jamb left showing is called a "reveal." This "reveal" differs regionally, so we suggest that you measure the reveal if you have a completed home and match accordingly.
- Casing for Your Installation: Plan head piece of casing atop the transom unit. Connect two side pieces of casing that run the combined length of the transom unit and door or U-Jamb (all the way to the finished floor). Carefully measure each piece with the reveal you have chosen, then miter cut the upper left and upper right corners. Attach casing with 2” trim nails — first to the jamb, then to the drywall.
Pro-Tip: If the installation of your upper piece of casing runs into the ceiling or conflicts with crown moulding planned for above, consider replacing the casing on the top with a piece of 1x material with no miter. The side pieces of casing should kill nicely into the 1x piece, and you can wrap the crown over the top of the 1x for a very nice, integrated look.
Mullion
Most people know about casing - the trim pieces that form a perimeter around doors, windows, cased openings and interior transoms.
- Purpose of Mullion: Mullion is a narrow, thin piece of symmetrical trim stock that covers the joint between the head jamb of a door or U-Jamb and the transom jamb where they are mulled together. The mullion runs horizontally covering the seam and is sandwiched between the two pieces of casing on each side (so casing is always installed first).
- Mullion for Your Installation: Measure the gap between the two pieces of casing. Cut mullion to match. You should have some reveal on the top and bottom of the mullion, but not necessarily the same reveal as the casing. The left and right end of the mullion should directly abut the casing. Install mullion with 1-1/4” trim nails.
- Zero-Gap: If the head jamb and transom’s jamb are mulled directly together, this is a zero-gap. In this case, we usually recommend 1-1/4” symmetrical mullion to cover the seam. This is most common.
- Taller Mulls: If you have increased the size of the mull, consider a wider piece of mullion or 1x4 to perform the mullion’s function.
Pro-Tip for Trim-Outs in a Rough Opening
For installations that require a U-Jamb, we always recommend pre-trimming out one side of the transom assembly while it is still on the floor. In this instance, the casing and mullion are nailed to the jamb perimeter before lifting the entire assembly into the rough opening. The trim-out on one side makes the overall assembly stiffer as it is raised into the rough opening -- which can make it easier to shim, square and level in this situation.
In order to simplify things, we do not specifically call for a pre-trim out in our installation instructions for doors and 4-sided openings. However, in these cases, most professional trim carpenters do actually trim-out one side of the assembly first because it is faster. Just beware that this technique can make shimming and squaring doors more difficult. For 4-sided openings pre-trimming is generally recommended without consequence.
I-TO-X-RO
Starting Point: Rough opening (In Wall).
Material Needed: Casing, mullion.
Tools Required: Miter saw, nail gun.
Casing
Most people know about casing - the trim pieces that form a perimeter around doors, windows, cased openings and interior transoms.
Casing profiles (that is, their cut or shape) differ regionally, so we leave it up to our customers to match the casing in their home.
- Purpose of Casing: When a house is first built, casing functions to conceal the gap between the edge of the rough opening and the jamb of the door, opening or window. Adding casing creates a "finished look."
- Reveal for Casing: Common industry practice leaves 1/4" of the face of the jamb showing (on the inner side) with the remainder of the jamb covered by the casing (outer side). This area of jamb left showing is called a "reveal." This "reveal" differs regionally, so we suggest that you measure the reveal if you have a completed home and match accordingly.
- Casing for your installation: For all 4 sides, carefully measure each piece with the reveal you have chosen, then miter cut the corners. Attach casing with 2” trim nails — first to the jamb, then to the drywall. You may need to place small shims behind the casing to compensate for the slight bow that the drywall corner bead creates in the wall.
Pro-Tip: If the installation of your upper piece of casing runs into the ceiling or conflicts with crown moulding planned for above, consider replacing the casing on the top with a piece of 1x material with no miter. The side pieces of casing should kill nicely into the 1x piece, and you can wrap the crown over the top of the 1x for a very nice, integrated look.
Pro-Tip for Trim-Outs in a Rough Opening
If you prefer, the casing can be nailed to the jamb perimeter on one side of the transom before lifting the entire assembly into the rough opening. Most professional trim carpenters do actually trim-out one side of the assembly first because it is faster. Just place shims from opposite side.
I-TO-W-RO
Starting Point: Finished, cased opening (Spacers).
Material Needed: Mullion. We recommend 1-1/4" symmetrical mullion for this installation.
Tools Required: Saw, nail gun.
Mullion
- Purpose of Mullion: Mullion is a narrow, thin piece of symmetrical trim stock that covers the joint between the two spacers added below the transom sash. The mullion runs horizontally covering the seam and is sandwiched between the two pieces of casing on each side.
- Mullion for Your Installation: Measure the gap between the two pieces of casing. Cut mullion to match. You should have some reveal on the top and bottom of the mullion, but not necessarily the same reveal as the casing. The left and right end of the mullion should directly abut the casing. Install mullion with 1-1/4” trim nails.
Starting Point: Finished, drywalled opening (In Wall).
Material Needed: Casing.
Tools Required: Miter saw, nail gun.
Casing
Most people know about casing - the trim pieces that form a perimeter around doors, windows, cased openings and interior transoms.
Casing profiles (that is, their cut or shape) differ regionally, so we leave it up to our customers to match the casing in their home.
- Purpose of Casing: When a house is first built, casing functions to conceal the gap between the edge of the rough opening and the jamb of the door, opening or window. Since we all associate casing with this "finished look", Transoms Direct prescribes adding casing whenever it is practical tp do so — even if there is no gap to cover. So if your starting point for today’s installation is a finished, drywalled opening, we recommend you add casing around the opening even if it is not technically needed. Casing just makes the final installation look more complete.
- Reveal for Casing: Common industry practice leaves 1/4" of the face of the jamb showing (on the inner side) with the remainder of the jamb covered by the casing (outer side). This area of jamb left showing is called a "reveal." This "reveal" differs regionally, so we suggest that you measure the reveal if you have a completed home and match accordingly.
- Casing for your installation: For all 4 sides, carefully measure each piece with the reveal you have chosen, then miter cut the corners. Attach casing with 2” trim nails — first to the jamb, then to the drywall. You may need to place small shims behind the casing to compensate for the slight bow that the drywall corner bead creates in the wall.
Pro-Tip: If the installation of your upper piece of casing runs into the ceiling or conflicts with crown moulding planned for above, consider replacing the casing on the top with a piece of 1x material with no miter. The side pieces of casing should kill nicely into the 1x piece, and you can wrap the crown over the top of the 1x for a very nice, integrated look.
I-TO-X-FOD
Material Needed: Paint, sandpaper, masking tape.
Tools Required: Paint brush.
Finishing our products, for the most part, does not require any special technique or skill. Hints for each type of finish are provided below.
Pro-Tip: We have found that it is usually easier to paint and clean many of our more intricate transoms before installation. Lay transom flat while painting.
- Sanding. All of our products have been sanded to a uniform, smooth finish before shipping. If you would like to touch-up the sanding job, we recommend light "hand sanding" with fine (150-220 grit) sandpaper. Be sure to sand "with the woodgrain" to avoid sanding marks. Note: Do not allow sandpaper to contact glass as this will damage the surface.
- Masking. This step is not required for clear glass — only for textured or etched glass. For clear glass, you will clean the glass with a razor in a later step. Other types of glass have an irregular surface and cannot be cleaned with a razor. Irregular glass can be covered with non-transfer type painter’s tape — leaving about 1/16” perimeter of glass showing around the edges (see tip on “setting the glass” below). Ensure that the edges of the tape are tightly adhered to glass to prevent finish from being drawn under tape by capillary action.
- Priming, Painting or Staining. Hints are provided below for most all finishing options.
- Priming. Any suitable wood primer works well with our products. After primer application, sand areas of "standing" wood grain -- to provide a smooth and more uniform final finish. Pro-Tip: Primers tend to bond to glass better than paint (making scraping harder), so try to avoid getting very much primer on the glass.
- Painting. Paint sash, stop and jamb with trim brush. Pro-Tip: You may note that glass lites fit loosely in the frame — moving around a bit in the slot created by the stiles, rails and muntins. This is normal. You may “set the glass” by allowing some of the paint to lap over onto glass (usually 1/8 to 1/4 inch). The thicker the better as this will make final scraping easier. If you have masked the glass, leaving a 1/16” gap around the perimeter will allow you to flood the gap and set the glass — even with the glass protected.
- Staining. For initial preparation, fine sanding of frame and muntin components is recommended to ensure uniform grain and porosity before staining. We have also found that wood conditioner will help to provide a more consistent stain base and minimize color variations due to grain. During stain application, any residual glue from manufacturing (usually at the joints) will appear as light spots. When these spots occur, simply sand the light area and reapply stain until stain penetrates into woodgrain. When possible, we recommend staining transoms before installation. This makes it easier to control the finish process and clean up any residue on the glass.
- Clear Finishes. We strongly recommend masking glass before applying any clear finish — even for clear glass. Clear finishes can adhere much more tenaciously and dry much harder than paints — so they are much harder to scrape from glass. Just as with paints and primers, clear finishes may be used to “set the glass” as described under painting section above.
- Cleaning the Glass. When properly applied, paint can be easily scraped from glass after finishing. The best technique is to use a sharp razor to trace the perimeter of all components. This creates a clean cut line between the wood parts and glass surface. After the cut line is completed, hold razor edge flat against glass at a shallow angle and drag it under the paint to remove. If you have masked the glass, you may want to use a razor scraper to clean up the edges of the flood coat used to set the glass. Pro-Tip: Using a glass cleaner to pre-wet the surface will help razor to slide along glass surface and avoid possible scratches. Keep applying through the cleaning process to keep surface lubricated.
I-PP
- Contact Info
- 225 Technology Park Ln
Fuquay Varina, NC 27526 - (919) 557-4446 (10am - 5pm USA ET)
- sales @ transomsdirect.com